Sunday, 3 September 2017

A Visit to New Quay, Wales

Hi,

   I haven't been on here for ages but I have had an extremely busy summer break this year.  We began the holidays by going away in our caravan to the Motorhome and Caravan Clubsite near New Quay in Wales.


   The weather was a bit hit and miss unfortunately but it didn't stop us getting out and about.  It varies very much between sunshine, cloud and the odd shower.  It was quite showery on our first day so we opted for a visit to The Honey Farm just outside New Quay.


    It was a lovely place to visit and was quite popular.  There was a super bee exhibition where you were able to get a closer look at how the bees create their nests and there were a few examples of these with bees active in them.  There was a meadary which smelled absolutely gorgeous! Also, we able to have a lovely coffee break in their cafe and then buy some honey and mead in the shop. It is well worth a visit if you near by anytime.

    We were lucky to get a really good sunny day and were able to visit New Quay.  We had a great day wandering around the seaside shops and, of course, partook in the obligatory fish and chips sat on the harbour wall.


  I couldn't believe our luck when we were able to see the dolphins in the harbour!  I have been to New Quay several times before and never seen them so I was over the moon!


  Anyone who knows me will know how much I love going exploring in our caravan and I always have a good stash of knitting, crochet or sewing with me for the evenings.  One of the projects I took was a crochet hat ready for Autumn.  I used a pattern from Bernat and some Storm cloud yarn from Hayfield to make these ready for the cooler weather. These are available on my Etsy site now.


    I will pop back soon to tell you more about my visits during the holidays.

Bye for now

Von x


Saturday, 27 May 2017

Baby Groot's!

Hi,
       I have had such a busy few weeks that I haven't had much crafting time.  One of the projects I have managed to have a go at and complete were these Baby Groot's from the film, Guardians of the Galaxy.


I made them for my son and daughter, who are both Marvel fans.  I managed to find a pattern from Twinkiechan on her blog.  It was really straight forward to follow.  First I crocheted the heads.


Then I added the twigs on top, eyes and a mouth.  Instantly you could see Baby Groot emerging.  Then, I moved onto crocheting the bodies....Which I did while sitting in the garden and catching some of the lovely weather we have had.


Finally I bought some small plant pots and wedged them in with some small pebble​s.  My kids love them and they are now on their desks in their bedrooms. 

Have a go...The pattern is really straight forward.

Bye for now

Von xx

Sunday, 30 April 2017

Festival Bag

Hi,

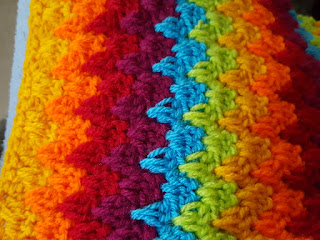
      I was having a little think about my next project and decided that I really needed a bit of colour for the next thing I would tackle.  By colour, I mean bright and bold!  So thinking about this made me think Summer and of the festival season.  So this lead me to come up with an idea for making a festival themed bag.

     I had a little look through my stash of wool and came up with these colours. (I later added a purple too!)


Then I went on to use a granny spike stitch using these colours to create the main body of the bag.


Following this, I folded it over and created an overlap for the opening and then stitched the sides together.


Once this was completed, I added tassels at the bottom of the bag with the coloured wool to create a lovely rainbow fringing effect.


Next I used a piece of muslin to create a simple lining and then sewed this securely into the inner of the bag.


After this, I began to crochet a multicoloured strap and edged it with red.


Finally, I added a lovely large button and a small crocheted loop to close the bag.


Then "Ta-dah!"   All done!  I really love this bag and it makes me very summery.  Take a look on my Etsy shop if you would like one.


Bye for now

Von  xx

Thursday, 13 April 2017

A Wedding Card

Hi,

    My brother got married this Easter and I wanted to make a handmade card for him and his new wife.  When I had visited the Hobbycrafts show at the NEC in November I had come across this lovely stencil from Imagination Crafts.


        I got a piece of linen and then drew out the stencil pattern on to the material.  You will notice I used a biro - I tried with pencil but it wasn't very clear.  


       I then began to embroider the branches with brown thread.   You can see from the photos below how I gradually built up the embroidery using the stencil outlines.


Following filling in the main picture, I added some seed beads to the flowers which lifted it a little bit.  

After that, I then used a simple running stitch to create a border.


Finally, I carefully removed threads to create a frayed edge and taped it to the card with some strong double sided tape. I have tried to use glue in the past and found it just creates awful looking lumps. 
So there we go... Ta Dah!


Really pleased with the final piece...Did keep looking at the space in the bottom though wondering whether I should have added some text.  Maybe another time...

Bye for now

Von xxx


Sunday, 2 April 2017

Easter Chick Tutorial


Hi,

    I have had such a busy week at work that I really needed to switch off this weekend so I set about focusing on a tutorial for my Easter Chick.  I have some of these made for sale on my Etsy shop too.


1. Chain 18, then join in to a circle with a slip stitch.


2. Chain 2, then double crochet around.


3. Chain 3, Triple crochet into the same stitch, *triple crochet into      the next stitch, then 2 triple crochet into the next stitch.      
     Repeat from  * around.  Slip stitch to chain 2.


4. Chain 3, then triple crochet around joining with a slip stitch to initial chain 2.


5. Chain 3, triple crochet decrease, 10 triple crochet, triple
    crochet decrease, 11 triple crochet, then slip stitch
    into top of chain 2.


6.  Flatten the piece and then slip stitch to join through 6 pairs of      stitches.


7.  Chain 2, double crochet around and slip stitch to join.


8.  Chain 2, double crochet all round and join initial chain 2 with       a slip stitch.


9.  Chain 2, 2 double crochet in the next stitch, 1 double crochet           in the next stitch, continue in this pattern around. Slip stitch         in initial chain 2.


10.  Chain 2,  double crochet all around, then slip stitch to join.

11 and 12.  Repeat row 9 twice.


13.  Chain 2, *2 double crochet, then decrease, continue round
       from * slip stitch to join in the initial chain 2.

14.  Chain 2, *double crochet, decrease. Continue from* round
        and slip stitch to join in the initial chain 2.

15. Chain 2, then decrease around joining with a slip stitch to
       initial chain 2.

16. Chain 2 then decrease around. Then fasten off. I sew the end in to
       close the hole at the top of the head.


To finish:-. Using some bright orange yarn I crochet a simple beak.
1. Chain 5, then double crochet across from 2nd chain from hook.
2. Slip stitch two ends to join.
3. Double crochet across opposite stitches twice keeping loops on
    hook, then pull thread through all loops. Fasten off.  Sew to
    head.

Then, using some black embroidery yarn I stitched two eyes.

Finally, add your chocolate egg and Ta Dah!


  Enjoy making and have a lovely Easter.

Bye for now

Von x


Saturday, 25 February 2017

Wedding Guest Book

Hi,

    My brother is got married last weekend and he had asked me to create a wedding guest book for the day.  It was a fabulous day and they looked marvellous together.


   So I set about this by firstly buying a simple plain white scrapbook from Hobbycraft.


Then I bought some Hessian on a roll approx. 12 cm wide and  some white lace.


I glued these to the one side of the book adding a simple bow with some ribbon.


After that I used my crochet skills to crochet two hearts from a a white cotton thread using the pattern from Crochet Tea Party and glued these to the top and bottom of the band.


Then to personalise it I added a photo of the happy couple and backed this on Hessian and got my talented mum to make a small card with their names and wedding date on.


Inside, I added some personalised stickers that I had bought off Amazon and my talented daughter created a stencilled painting for the first page.


And that was it...all ready to go!


Bye for now

Von x