Hi,
I was having a little think about my next project and decided that I really needed a bit of colour for the next thing I would tackle. By colour, I mean bright and bold! So thinking about this made me think Summer and of the festival season. So this lead me to come up with an idea for making a festival themed bag.
I had a little look through my stash of wool and came up with these colours. (I later added a purple too!)
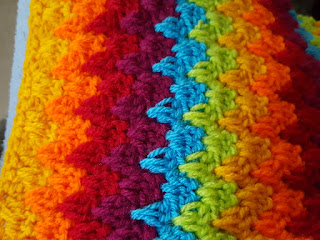
Then I went on to use a granny spike stitch using these colours to create the main body of the bag.
Following this, I folded it over and created an overlap for the opening and then stitched the sides together.
Once this was completed, I added tassels at the bottom of the bag with the coloured wool to create a lovely rainbow fringing effect.
Next I used a piece of muslin to create a simple lining and then sewed this securely into the inner of the bag.
After this, I began to crochet a multicoloured strap and edged it with red.
Finally, I added a lovely large button and a small crocheted loop to close the bag.
Then "Ta-dah!" All done! I really love this bag and it makes me very summery. Take a look on my Etsy shop if you would like one.
Bye for now
Von xx
A very warm welcome to our little blog patch here at Studio 107. We have undergone a change of name recently with a renewed focus on all the crafts that we enjoy to explore. The new focus behind the change of name is to share our inspiration, some patterns and tutorials for many of the crafts that we enjoy. This will, also, link with our Etsy shop and instagram stories. Please pop by when you can!
Sunday, 30 April 2017
Thursday, 13 April 2017
A Wedding Card
Hi,
My brother got married this Easter and I wanted to make a handmade card for him and his new wife. When I had visited the Hobbycrafts show at the NEC in November I had come across this lovely stencil from Imagination Crafts.
My brother got married this Easter and I wanted to make a handmade card for him and his new wife. When I had visited the Hobbycrafts show at the NEC in November I had come across this lovely stencil from Imagination Crafts.
I got a piece of linen and then drew out the stencil pattern on to the material. You will notice I used a biro - I tried with pencil but it wasn't very clear.
I then began to embroider the branches with brown thread. You can see from the photos below how I gradually built up the embroidery using the stencil outlines.
Following filling in the main picture, I added some seed beads to the flowers which lifted it a little bit.
After that, I then used a simple running stitch to create a border.
Finally, I carefully removed threads to create a frayed edge and taped it to the card with some strong double sided tape. I have tried to use glue in the past and found it just creates awful looking lumps.
So there we go... Ta Dah!
Really pleased with the final piece...Did keep looking at the space in the bottom though wondering whether I should have added some text. Maybe another time...
Bye for now
Von xxx
Sunday, 2 April 2017
Easter Chick Tutorial
Hi,
I have had such a busy week at work that I really needed to switch off this weekend so I set about focusing on a tutorial for my Easter Chick. I have some of these made for sale on my Etsy shop too.
1. Chain 18, then join in to a circle with a slip stitch.
2. Chain 2, then double crochet around.
3. Chain 3, Triple crochet into the same stitch, *triple crochet into the next stitch, then 2 triple crochet into the next stitch.
Repeat from * around. Slip stitch to chain 2.
4. Chain 3, then triple crochet around joining with a slip stitch to initial chain 2.
5. Chain 3, triple crochet decrease, 10 triple crochet, triple
crochet decrease, 11 triple crochet, then slip stitch
into top of chain 2.
6. Flatten the piece and then slip stitch to join through 6 pairs of stitches.
7. Chain 2, double crochet around and slip stitch to join.
8. Chain 2, double crochet all round and join initial chain 2 with a slip stitch.
9. Chain 2, 2 double crochet in the next stitch, 1 double crochet in the next stitch, continue in this pattern around. Slip stitch in initial chain 2.
10. Chain 2, double crochet all around, then slip stitch to join.
11 and 12. Repeat row 9 twice.
13. Chain 2, *2 double crochet, then decrease, continue round
from * slip stitch to join in the initial chain 2.
14. Chain 2, *double crochet, decrease. Continue from* round
and slip stitch to join in the initial chain 2.
15. Chain 2, then decrease around joining with a slip stitch to
initial chain 2.
close the hole at the top of the head.
To finish:-. Using some bright orange yarn I crochet a simple beak.
1. Chain 5, then double crochet across from 2nd chain from hook.
2. Slip stitch two ends to join.
3. Double crochet across opposite stitches twice keeping loops on
hook, then pull thread through all loops. Fasten off. Sew to
head.
Then, using some black embroidery yarn I stitched two eyes.
Finally, add your chocolate egg and Ta Dah!
Enjoy making and have a lovely Easter.
Bye for now
Von x
Subscribe to:
Comments (Atom)


