Sunday, 30 April 2017

Festival Bag

Hi,

      I was having a little think about my next project and decided that I really needed a bit of colour for the next thing I would tackle.  By colour, I mean bright and bold!  So thinking about this made me think Summer and of the festival season.  So this lead me to come up with an idea for making a festival themed bag.

     I had a little look through my stash of wool and came up with these colours. (I later added a purple too!)


Then I went on to use a granny spike stitch using these colours to create the main body of the bag.


Following this, I folded it over and created an overlap for the opening and then stitched the sides together.


Once this was completed, I added tassels at the bottom of the bag with the coloured wool to create a lovely rainbow fringing effect.


Next I used a piece of muslin to create a simple lining and then sewed this securely into the inner of the bag.


After this, I began to crochet a multicoloured strap and edged it with red.


Finally, I added a lovely large button and a small crocheted loop to close the bag.


Then "Ta-dah!"   All done!  I really love this bag and it makes me very summery.  Take a look on my Etsy shop if you would like one.


Bye for now

Von  xx

Thursday, 13 April 2017

A Wedding Card

Hi,

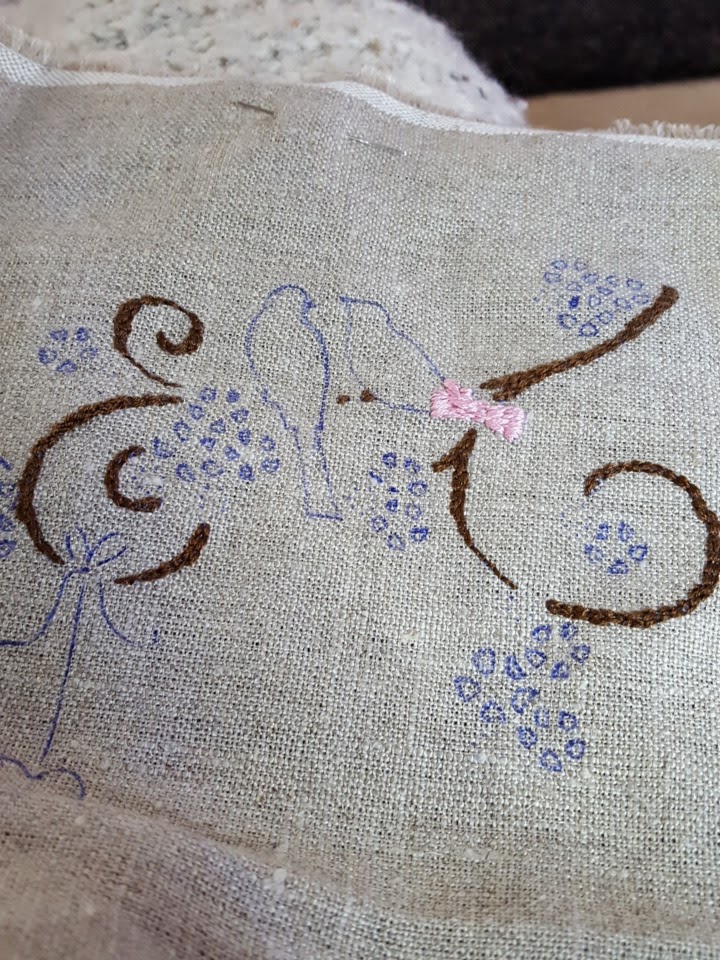
    My brother got married this Easter and I wanted to make a handmade card for him and his new wife.  When I had visited the Hobbycrafts show at the NEC in November I had come across this lovely stencil from Imagination Crafts.


        I got a piece of linen and then drew out the stencil pattern on to the material.  You will notice I used a biro - I tried with pencil but it wasn't very clear.  


       I then began to embroider the branches with brown thread.   You can see from the photos below how I gradually built up the embroidery using the stencil outlines.


Following filling in the main picture, I added some seed beads to the flowers which lifted it a little bit.  

After that, I then used a simple running stitch to create a border.


Finally, I carefully removed threads to create a frayed edge and taped it to the card with some strong double sided tape. I have tried to use glue in the past and found it just creates awful looking lumps. 
So there we go... Ta Dah!


Really pleased with the final piece...Did keep looking at the space in the bottom though wondering whether I should have added some text.  Maybe another time...

Bye for now

Von xxx


Sunday, 2 April 2017

Easter Chick Tutorial


Hi,

    I have had such a busy week at work that I really needed to switch off this weekend so I set about focusing on a tutorial for my Easter Chick.  I have some of these made for sale on my Etsy shop too.


1. Chain 18, then join in to a circle with a slip stitch.


2. Chain 2, then double crochet around.


3. Chain 3, Triple crochet into the same stitch, *triple crochet into      the next stitch, then 2 triple crochet into the next stitch.      
     Repeat from  * around.  Slip stitch to chain 2.


4. Chain 3, then triple crochet around joining with a slip stitch to initial chain 2.


5. Chain 3, triple crochet decrease, 10 triple crochet, triple
    crochet decrease, 11 triple crochet, then slip stitch
    into top of chain 2.


6.  Flatten the piece and then slip stitch to join through 6 pairs of      stitches.


7.  Chain 2, double crochet around and slip stitch to join.


8.  Chain 2, double crochet all round and join initial chain 2 with       a slip stitch.


9.  Chain 2, 2 double crochet in the next stitch, 1 double crochet           in the next stitch, continue in this pattern around. Slip stitch         in initial chain 2.


10.  Chain 2,  double crochet all around, then slip stitch to join.

11 and 12.  Repeat row 9 twice.


13.  Chain 2, *2 double crochet, then decrease, continue round
       from * slip stitch to join in the initial chain 2.

14.  Chain 2, *double crochet, decrease. Continue from* round
        and slip stitch to join in the initial chain 2.

15. Chain 2, then decrease around joining with a slip stitch to
       initial chain 2.

16. Chain 2 then decrease around. Then fasten off. I sew the end in to
       close the hole at the top of the head.


To finish:-. Using some bright orange yarn I crochet a simple beak.
1. Chain 5, then double crochet across from 2nd chain from hook.
2. Slip stitch two ends to join.
3. Double crochet across opposite stitches twice keeping loops on
    hook, then pull thread through all loops. Fasten off.  Sew to
    head.

Then, using some black embroidery yarn I stitched two eyes.

Finally, add your chocolate egg and Ta Dah!


  Enjoy making and have a lovely Easter.

Bye for now

Von x


Saturday, 25 February 2017

Wedding Guest Book

Hi,

    My brother is got married last weekend and he had asked me to create a wedding guest book for the day.  It was a fabulous day and they looked marvellous together.


   So I set about this by firstly buying a simple plain white scrapbook from Hobbycraft.


Then I bought some Hessian on a roll approx. 12 cm wide and  some white lace.


I glued these to the one side of the book adding a simple bow with some ribbon.


After that I used my crochet skills to crochet two hearts from a a white cotton thread using the pattern from Crochet Tea Party and glued these to the top and bottom of the band.


Then to personalise it I added a photo of the happy couple and backed this on Hessian and got my talented mum to make a small card with their names and wedding date on.


Inside, I added some personalised stickers that I had bought off Amazon and my talented daughter created a stencilled painting for the first page.


And that was it...all ready to go!


Bye for now

Von x


Friday, 24 February 2017

Baby Blanket

Hi,

     It has been so hectic since Christmas, I seem to always find January really busy I don't know why?  Anyway I have been happily crocheting and knitting away the dark evenings with a number of projects on the go.  I decided February was the time to finish off some projects so I have been busy working through these.

    One of my projects was to create a baby blanket for my Etsy shop.  I decided upon a girl's blanket with the classic pink theme.  I opted for a ripple blanket and used James C Brett DK to crochet this sweet little blanket.


    I was soon busy rippling away through the colours to create a beautiful pink ripply pram blanket.


    I tend to use the neat ripple pattern from Attic 24 for any ripple blankets I make.  Lucy's instructions are really clear to follow and then I just tend to mix and match the colours and width of the ripples as I feel.


To finish, I follow Attic 24 initially for the edging and then tend to add my own spin to finish off.  For this blanket I chose a two coloured chain edging. I think it looks quite effective.  Fiddly to do though!


This blanket is up for sale on my Etsy shop now....So take a look!

Bye for now

Von x

Friday, 10 February 2017

Little Chick

Hi,

       With Easter approaching I started to think about gifts for Easter.  I have previously seen knitted chicks in which you can place a small chocolate egg so I started to look at crochet patterns.    After looking around I just could not find one which I really liked so I set myself the challenge of creating my own pattern.

   I began with a ring that was large enough to put a small chocolate egg through.


  Then, I continued to triple crochet around to create the body and then joined this leaving a small gap to crochet around to create the head.


   Finally I added an orange beak and used some black embroidery thread to create the eyes.  Then I popped an egg inside to hold his body in position,


    I am quite pleased with this but just need to work on the pattern so I can put a tutorial on soon.

Bye for now

Von x

Sunday, 5 February 2017

Socks!

Hi,

      I was lucky to receive the book "Super Socks" by Winwickmum over Christmas and the necessary tools to begin knitting socks.

I have tried different crochet patterns to make socks with not much success so I decided I needed to set myself the challenge of knitting instead.  I had researched on the internet and came across "Winwickmum" and her sock adventures on her blog and decided that was the way to go!  This resulted in a list for my hubby as a guide for xmas presents!

     Since Christmas, after a couple of false starts, I have managed to make gradual progress with this and I am well on my well to finishing my first sock!   Have a look at the photos below to see my progress...


I had got in a muddle with this starting point with the rib and had not realised I need to join so early but started again and soon had it sorted!


The book has been a great help and I am almost on to the toes now!  I am so pleased with the result so far!  I will post again soon to show off my first finished sock!

Bye for now

Von x